
Writing packages for internal use, or developing open source projects? Go packages with clean and clear APIs will increase the chances of them being reused and maintained. Explore best practices, goals, and idioms that help make well-crafted packages with the tips below.
Packages
A GoLang package is simply a folder containing Go files. They should be grouped together by responsibility or behaviour. You should have a reason for creating a new package and it should be elegant, but obvious in what it’s trying to solve. Think about who will be using your project and packages and where it will be used.
Packages should have purpose and meaning. Try not to create them just because you feel you need to. Sometimes a flat directory structure works. Nevertheless, as you continue to grow your packages, it makes sense to separate them by responsibility.
Naming
A great package starts with a name. It should be short, unique, describe what it’s doing and derive from its purpose. Ask yourself “What does this package provide?” instead of “What is in this package?”
- Avoid clashing with the standard library, for example
http. This can cause confusing imports. - Avoid plurals; prefer
stringsliceoverstringslices.
Name your packages after what they provide, not what they contain. Dave Cheeney
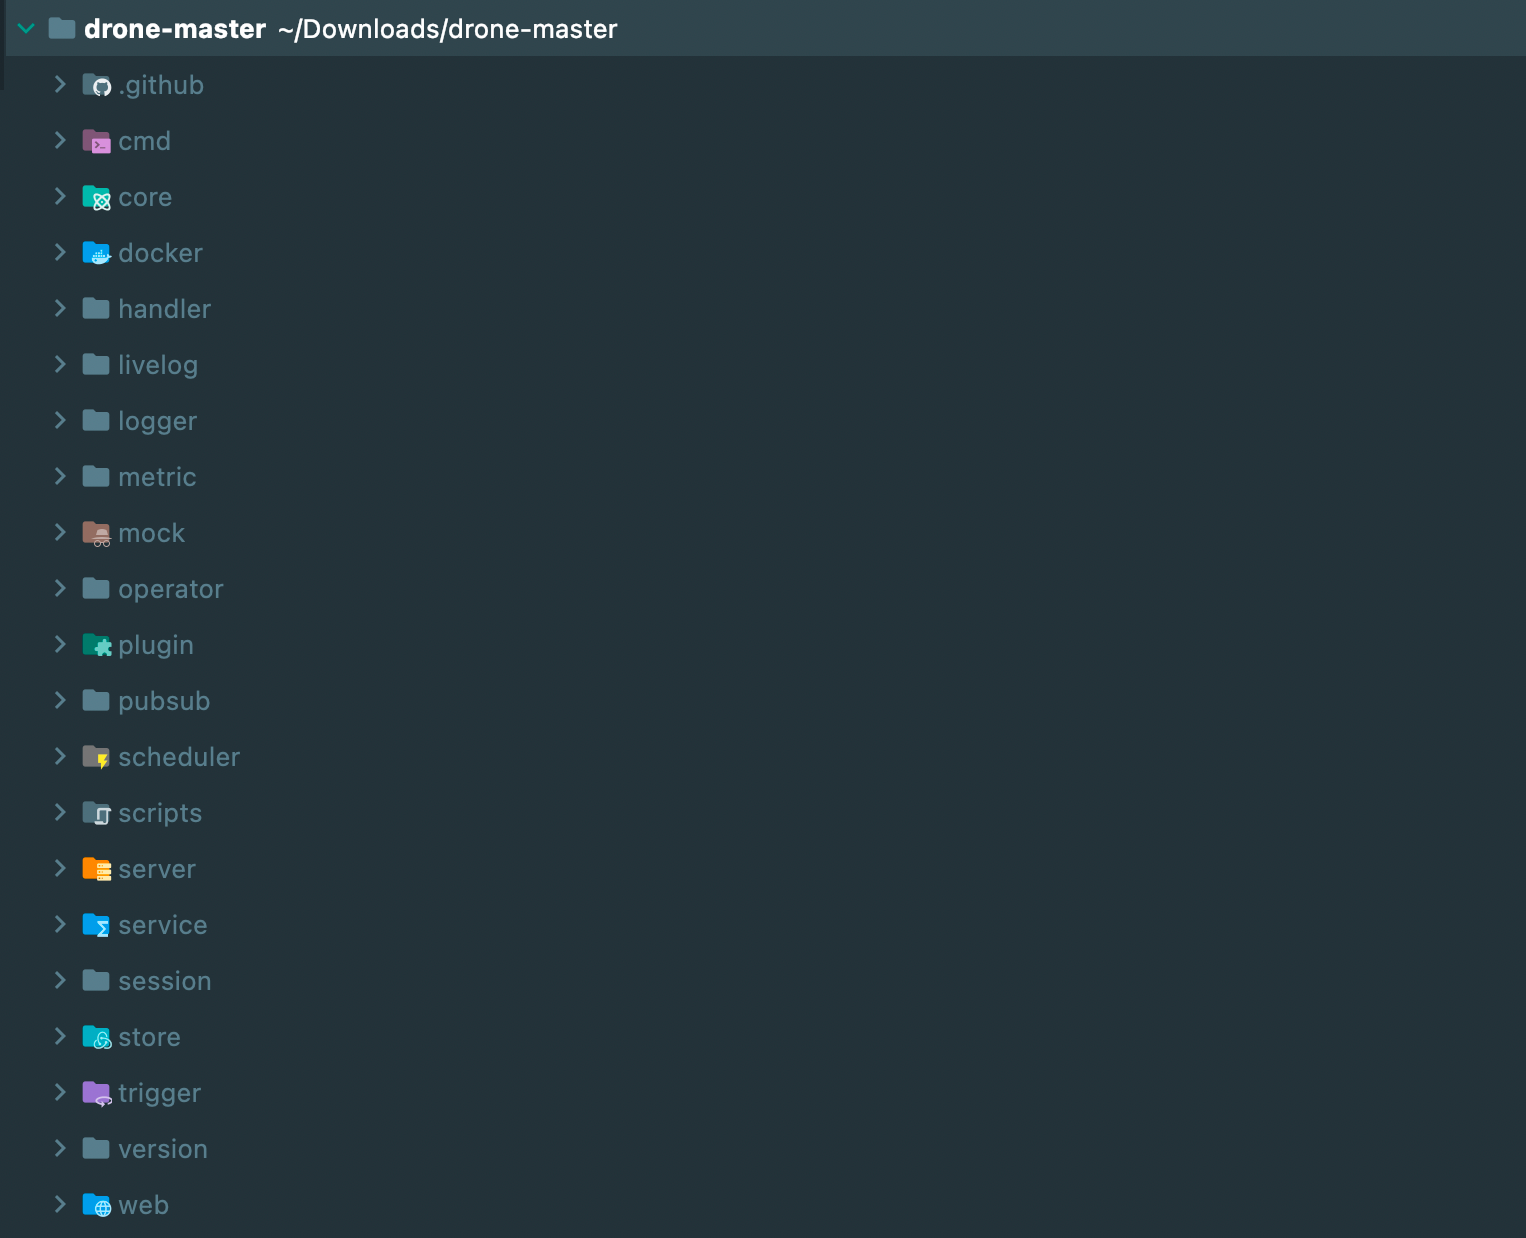
Drone’s directory structure, layout and idioms are extremely well-crafted. You can see the directory structure of the project below.
Files
Name your Go files as to what they are. Don’t try to be too clever here; it should be obvious what the file is describing. Try to separate Go files into what they are doing within the package.
A great bible for naming things in Go is the standard library. Multiple .go files are broken down into
responsibilities and clear use cases.
Avoid Util
Packages that are named util, helpers or common contain an assortment of unrelated functions. Usually they are
made to break an import cycle, but as the project grows in size, the package doesn’t reflect its purpose.
Instead of creating utility packages, try to abstract common functions and group them by their behaviour. Below are
two utility functions that calculate the percentage of the given part and total.
 1// percent.go
 2
 3// Of calculates what percent [number1] is of [number2].
 4// ex. 300 is 12.5% of 2400.
 5func Of(part int, total int) float64 {
 6    return (float64(part) * float64(100)) / float64(total)
 7}
 8
 9// OfFloat calculates what percent [number1] is of [number2].
10// ex. 300 is 12.5% of 2400.
11func OfFloat(part float64, total float64) float64 {
12    return (part * float64(100)) / total
13}
If these functions were placed in a util package, we would have a method signature similar to below:
1p := util.PercentOf(1, 100)
However, with the package structure illustrated above, our method signature changes to:
1p := percent.Of(1, 100)
This is more declarative, easier to read, and simpler to understand. In addition, we don’t have a spider’s web of arbitrary functions that are completely unrelated to one another.
Structure
There is no official standard project layout within the realms of GoLang. However, there are well-documented articles that can guide you through what’s deemed as standard, such as the standard GoLang project structure on GitHub.
However, it’s best practice not to create these folders as soon as you start. Only create them if they are necessary. Sometimes a flat directory structure will suffice, but this entirely depends on your project.
cmd
Stands for commands. You should include CLI commands and functions within this directory. Popular packages to bootstrap your command line applications include Cobra and CLI.
pkg
The main library code should be kept here. Expect users to import these types into their projects. It’s not necessary to
use /pkg in smaller projects.
Travis Jeffery goes
over this in more detail.
internal
Private library code that your end users will not be able to access. This folder is great for obfuscating code and reducing your API footprint.
bin
Any bash scripts that are used for generating data, deploying codebases or any other utilities should be stored here.
testdata
Well, test data. This is usually on a per package level and has been adopted by the Go community to provide files for testing your API against.
DDD (Domain Driven Design)
One thing that got me frustrated when moving from PHP to Go was cyclomatic dependencies. The
famous import cycle not allowed haunted me until I discovered something: domain driven design (DDD).
What’s DDD?
DDD was first thought up by Eric Evans in 2003, in a book he published called Tackling Complexity in the Heart of Software. It revolves around the idea of establishing your main types and behaviour in a centralised folder or package, and having the software implement this behaviour elsewhere.
Eric Evans establishes that DDD is predicated on the following goals:
- Placing the project’s primary focus on the core domain and domain logic.
- Basing complex designs on a model of the domain.
- Initiating a creative collaboration between technical and domain experts to iteratively refine a conceptual model that addresses particular domain problems.
The domain package
When starting a new project, think about the top-level functions and types before even starting to write any code. What
does your application need? What does it do? How is it going to behave? We can then move onto creating the
all-magical domain package.
Our domain package describes types (structs) and behaviours (interfaces) that our services will later implement. It can
be called whatever you like – domain, types, definitions or even the name of the package you are creating; but
the main takeaway is that it should not import anything from other parts of your project. It should be a reference
point for types across the whole application, which eliminates cyclomatic dependencies.
Say we have a file upload system we need to implement:
 1type (
 2    // File represents a singular file entity that has been
 3    // uploaded to the system.
 4    File struct {
 5		ID   	int   	`db:"id" json:"id"`
 6		UUID 	uuid.UUID   `db:"uuid" json:"uuid"`
 7		URL  	string	`db:"url" json:"url"`
 8		Name 	string	`db:"name" json:"name"`
 9		Path 	string	`db:"path" json:"path"`
10		FileSize   int64 	`db:"file_size" json:"file_size"`
11    }
12    // FileRepository defines the methods for modifying files on
13    // the system.
14    FileRepository interface {
15		List() ([]File, error)
16		Find(id int64) (File, error)
17		Upload(f File) error
18		Update(f File) error
19		Delete(id int64) error
20    }
21)
Here we have described a File and a FileRepository. The File being our type and Repository being our behaviour.
The great thing about this approach is that we can encapsulate functions specific to a type within the domain layer. For example, if we want to find out the extension of our file or check if the file exists on the local storage system, we can do so by using a method receiver and gaining access to the struct fields.
 1// Extension returns the extension of the file.
 2func (f File) Extension() string {
 3	return filepath.Ext(f.Name)
 4}
 5
 6// Exists determines if the file exists on the local
 7// file system.
 8func (f File) Exists() bool {
 9    _, err := os.Stat(f.Path)
10    if err == nil {
11		return true
12    }
13    if errors.Is(err, os.ErrNotExist) {
14		return false
15    }
16	return false
17}
Implementation
In our “file” service, we now need to implement the methods as defined in the FileRepository. Under a package
called Files we can create a new type called Service and flesh out the method signatures to implement
the FileRepository.
Below is an example of the service with no implementation.
 1type Service struct {
 2	// DB Connection?
 3}
 4
 5func (s *Service) List() ([]File, error) {
 6	return nil, nil
 7}
 8
 9func (s *Service) Find(id int64) (File, error) {
10	return File{}, nil
11}
12
13func (s *Service) Upload(f File) error {
14	return nil
15}
16
17func (s *Service) Update(f File) error {
18	return nil
19}
20
21func (s *Service) Delete(id int64) error {
22	return nil
23}
Interfaces
Where possible, try to accept interfaces and return structs; a fantastic Go mantra that has been adopted by the wider community. This means we should accept polymorphic arguments and return specific types, which enables the end user to write implementations and pass them to your functions.
Accepting interfaces
By accepting specific types, we limit the opportunity for the user to use functions in different ways. The function below accepts a byte buffer and a file (as described in the example above), then reads from a path and writes the content of the file to the buffer.
1func ReadFile(buf *bytes.Buffer, f *File) error {
2    file, err := os.ReadFile(f.Name)
3    if err != nil {
4 		return err
5    }
6    buf.Write(file)
7    return nil
8}
What happens if the user wants to stream the contents to a http writer? Or write the file contents to another file? If
we used a io.Writer, we could achieve this:
 1func ReadFile(w io.Writer, f *File) error {
 2    file, err := os.ReadFile(f.Name)
 3    if err != nil {
 4		return err
 5    }
 6    _, err = w.Write(file)
 7    if err != nil {
 8		return err
 9    }
10    return nil
11}
Single method
The bigger the interface, the weaker the abstraction. Go Proverbs
Narrow types such as singular method interfaces are powerful, as they are extremely easy to implement. For this reason, users of your package are more likely to implement and digest them. People can also use them as function adapters if they are singular, making them even more diverse.
By extending our file service, we can extract our ReadFile() method to a FileReader interface.
1type FileReader interface {
2	ReadFile(w io.Writer, f *File) error
3}
Now we don’t have to make assumptions about where to read this file from. It can be from a remote or local file system, as shown below.
1type LocalFS struct{}
2
3func (l LocalFS) ReadFile(w io.Writer, f *File) error {
4    // Read from local file system
5    return nil
6}
1type RemoteFS struct{}
2
3func (l RemoteFS) ReadFile(w io.Writer, f *File) error {
4    // Read from remote file system
5    return nil
6}
Testing
If you’re writing interfaces for your packages, it’s a good idea to have utility functions that contributors can test
against if they are writing a new implementation. We can utilise the t.Helper() function, which marks the test as a
helper function, as shown below.
1func TestInterface(t *testing.T) { // More arguments?
2    t.Helper()
3    // Implement test table
4}
Footprints
Leaving a small API footprint in your packages can make for a pleasant experience when potential users consume them. Mat Ryer suggests that having a small list of constants, functions and types is easier for the user to digest. You don’t have to endlessly scroll through a long list of definitions when looking for something you need within the package.
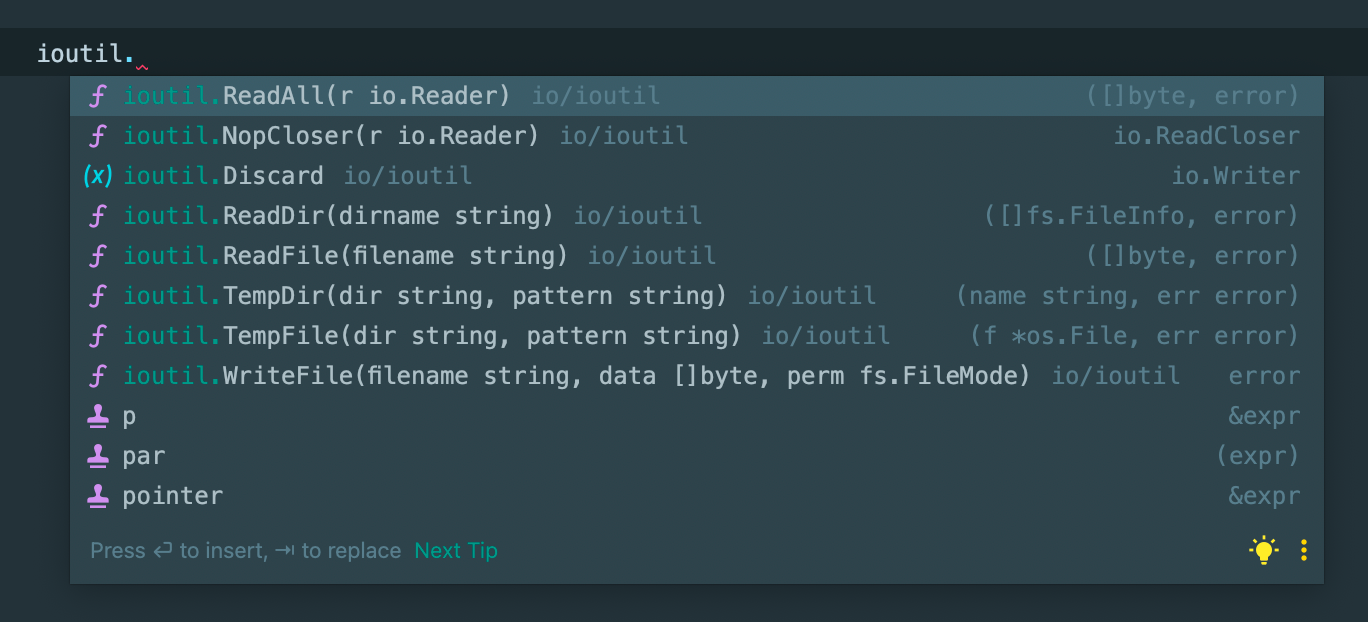
Below is an example of the types under ioutil. The footprint of the API is very small, and it’s clear to see what
entities there are in the package.
Don’t expose implementations of interfaces if you don’t necessarily need to, as it makes the package smaller.
Changing perspective
Try to look at the API footprint from the end user’s perspective and create examples by using package_test files.
Test files that declare a package with the suffix “_test” will be compiled as a separate package, and then linked and run with the main test binary. GoDoc
For example, using the FileReader interface described above, we could test against the local file system and see how
our API looks from the outside in.
 1package file_test // Note the use of _test here
 2
 3import (
 4    "bytes"
 5    file "errorhandling"
 6    "testing"
 7)
 8
 9func TestFileReader(t *testing.T) {
10    l := file.LocalFS{} // file.LocalFS instead of LocalFS
11    buf := &bytes.Buffer{}
12    err := l.ReadFile(buf, &file.File{ // file.File instead of File
13		Name: "gopher.jpg",
14		Path: "/var/www",
15    })
16    if err != nil {
17		t.Fatalf("expected nil, got: %s", err.Error())
18    }
19}
Avoid constructors (where possible)
Sometimes adding New to a package isn’t necessary. For example, if we wanted to create a local file system that
accepts a base path to work from and returns a new struct, we could be tempted to create a constructor function like
below:
1type LocalFS struct {
2    BasePath string
3}
4
5func NewLocalFS(path string) *LocalFS {
6    return &LocalFS{BasePath: path}
7}
Using the constructor approach is, admittedly, a lot less to write, but it’s also less verbose. Instantiating by value is a lot clearer and easier to read.
1// Constructor
2NewLocalFS("my-path")
3// By value
4lfs := LocalFS{
5    BasePath: "my-path",
6}
Of course sometimes this simply isn’t possible, as you have to validate or create values for the struct.
Defaults
Think about what happens to your application in the default state. Where validation is 100% necessary, return errors, otherwise return default structs and types.
Flexibility
It’s wise to give the user as much flexibility in your package as possible. Where appropriate, ask the user to provide an implementation or struct, and if they don’t, fall back to a default.
A great example of this is asking for a http.Client as an argument. Users of your package may want to set custom time
outs and transport. It’s easy to set defaults on initialisation like below:
1type Service struct {
2    client *http.Client
3}
4
5func New() *Service{
6    return &Service{client: http.DefaultClient}
7}
However, the following implementation is more flexible by comparison, as we are not assuming that the end user wants
to use the default http client. We are still falling back to the standard library http.DefaultClient if the Client
is nil.
 1// project.go
 2type Service struct {
 3    Client *http.Client
 4}
 5
 6func (c *Service) Do() {
 7    if c.client == nil {
 8		c.client = http.DefaultClient
 9    }
10    // Make request...
11}
12
13// Outside of project
14c := Service{
15    Client: &http.Client{
16		Timeout: time.Second * 10,
17    },
18}
Config
If you have more than four function arguments, turn them into a Config struct. By doing so, it becomes more verbose
and readable as we are passing in types that are explicit.
 1func SendMail(subject string, to []string, cc []string, bcc []string, content []byte) error {
 2    // Send some mail
 3    return nil
 4}
 5
 6// Send
 7err := SendMail("gopher", []string{"hello@gophers.com"}, "", "", []byte("hello"))
 8if err != nil {
 9    return err
10}
 1func SendMail(cfg Config) error {
 2    // Send some mail
 3    return nil
 4}
 5
 6c := Config{
 7    Subject: "gopher",
 8    To:  	[]string{"hello@gophers.com"},
 9    Content: []byte("hello"),
10}
11err := SendMail(c)
12if err != nil {
13    return err
14}
Which do you think is more readable? If the former, users will most likely have to refer to the function arguments, and perhaps even look at the documentation. By using a configuration struct, we can explicitly define which arguments are to be passed.
Validation
Validate, validate, validate. If you cannot assign default values to a field, return an error back. Using our
configuration struct above, we can add a Validate() method, which ensures that values that are required are validated
against. Below is a simple example of validating a mailer configuration as defined
in
Go Mail, a popular cross-platform email driver for Go.
 1func (c Config) Validate() error {
 2    if c.Subject == "" {
 3		return errors.New("mail must have a subject")
 4    }
 5    if len(c.To) == 0 {
 6		return errors.New("mail must have recipients")
 7    }
 8    if c.Content == nil {
 9		return errors.New("mail must have content")
10    }
11    return nil
12}
Doc
Established documentation defines how well your package will be consumed. If you provide well laid out, easy to read documentation to your package, it will increase the chances of your package being used. In contrast, if there is no documentation or the content is hard to read, it might make potential users shy away from it.
godoc
Use godoc early, as it extracts and generates great documentation for your packages. Using the command below, you are able to see the result of godoc before publishing.
1godoc -http=:6060
For more detailed tips and tricks for using godoc, see Elliot Chance’s post on Medium.
README.md
When writing a readme, ensure to include a catchline that will lure your users in. 80% of repositories will also get used more if you have a logo or mascot (for open source projects).
Assume you are reading the readme for the first time and you know nothing about the project. Does it indicate what language it’s written in? Its dependencies? The problem it’s trying to solve?
Clear installation instructions at the top of the readme, followed by brief examples, are a must-have for any package and will help you gain traction in the open source community.
Tooling
Using a few of the tools below can help improve the readability and maintainability of your package.
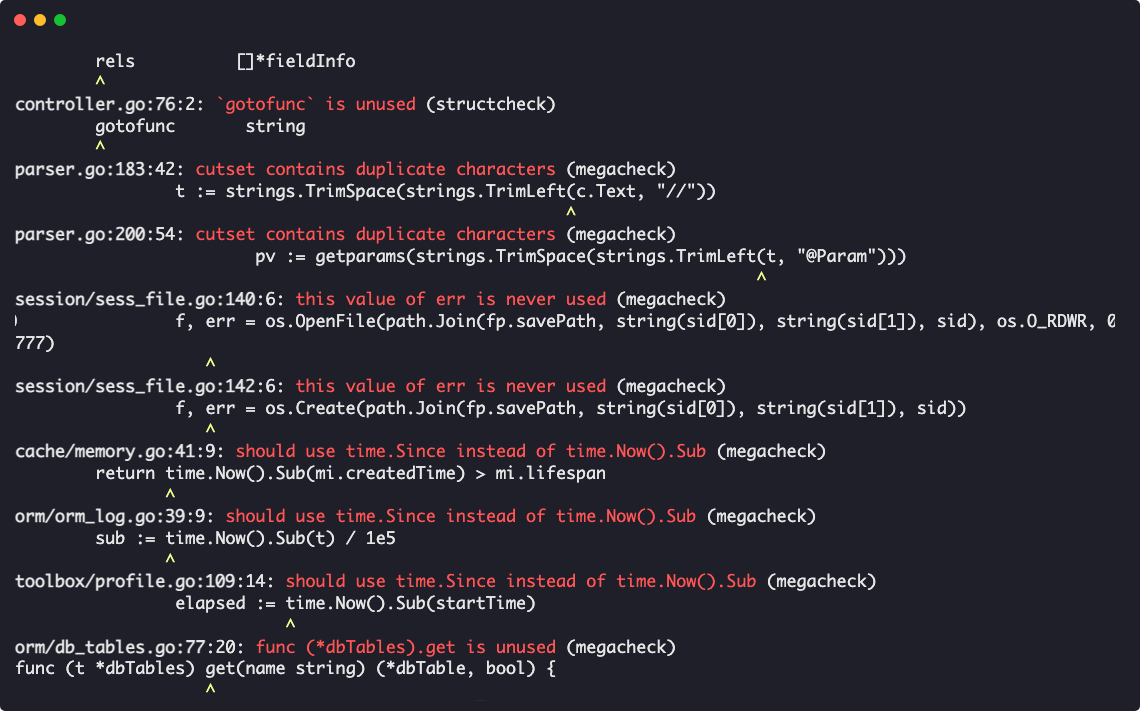
Linting
golangci-lint is a rapid Go linter that integrates well with most IDEs and Github Actions. Colourised output with in-built linting ensures that code is uniform across the board.
Go Report Card is also a great way of checking that your code conforms to Go standards, and you also get a shiny badge alongside it.
MakeFile
Make files are an easy way to run, set up and test your code. They’re a gateway to provide your users with easy tooling as soon as they clone your package and make it easier for potential developers to contribute to the package.
 1setup:
 2    go mod tidy
 3.PHONY: setup
 4
 5format:
 6    go fmt ./...
 7.PHONY: format
 8
 9lint:
10    golangci-lint run ./...
11.PHONY: lint
12
13test:
14    go clean -testcache && go test -race $$(go list ./... | grep -v tests | grep -v mocks) -coverprofile=coverage.out -covermode=atomic
15.PHONY: test
16
17test-v:
18    go clean -testcache && go test -race -v $$(go list ./... | grep -v tests | grep -v mocks) -coverprofile=coverage.out -covermode=atomic
19.PHONY: test-v
20
21cover: test
22    go tool cover -html=coverage.out
23.PHONY: cover
24
25doc:
26    godoc -http localhost:8080
27.PHONY: doc
28
29all:
30    $(MAKE) format
31    $(MAKE) lint
32    $(MAKE) test
Wrapping up
We’ve touched on a few bases on how to create well-crafted packages for GoLang. Just implementing a few of the tricks and tips above will help your packages become more maintainable, readable and easier to use. Remember to look at other people’s work! It always helps to see how other people and companies are using Go idioms to their advantage.
Useful links
- Writing Beautiful Packages in Go by Mat Ryer
- Domain Driven Development (DDD) in GoLang
- Accept interfaces, return structs by Bryan F Tan
- Standard project layout in GoLang
- Avoid package names like base, util, or common by Dave Cheeney
- Input validation in GoLang by Aram Petrosyan
- How to write unit tests in Go